Mac Mail - Mojave 10.14 - Setup Guide
Are you using the latest version of Apple's Mac OSX?
Please see our Monterey 12 Mac Mail SMTP server setup guide here.
Important Points
- First you need to make sure the email address(es) you will be sending from have been authorised in our Control Panel
- These instructions assume your email account has already been setup and is collecting email correctly
- Take a note of any settings you change
- Only change the items specified - you should not need to change POP3 / IMAP settings
- These instructions are for Mac Mail on Mojave 10.14 - for other programs please see How To Setup AuthSMTP or contact us
Step 1
- Open Mac Mail on Mojave by clicking the Icon
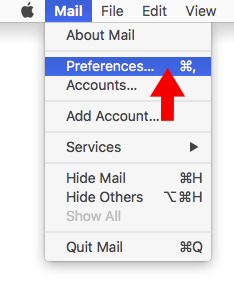
Step 2
- Go to the Mac 'Mail' menu and click 'Preferences'
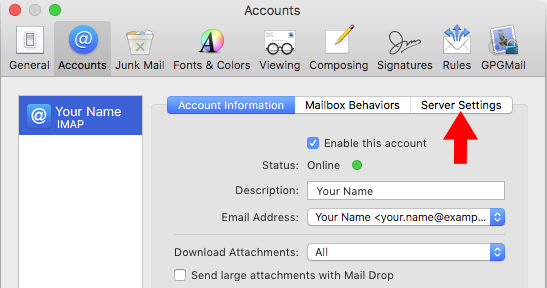
Step 3
- Click on the Mac Mail account you wish to edit
- If you have multiple accounts, you will need to edit each one separately
- We recommend that you restart Mac Mail between each config change
- Go to the 'Server Settings' tab
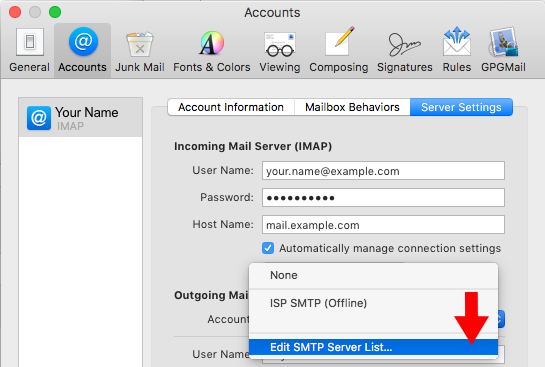
Step 4
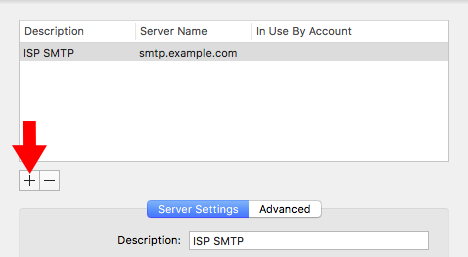
- Click on the 'Outgoing Mail Server' drop down menu and select 'Edit SMTP Server List...'
Step 5
- Click on the plus (+) button to add another SMTP server
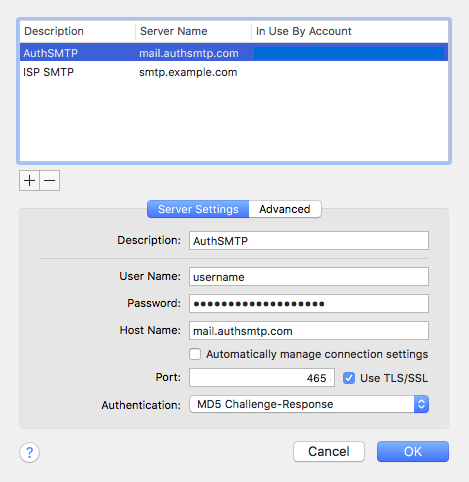
Step 6
- For the description enter 'AuthSMTP'
- Enter your AuthSMTP username and password
- Please ensure that you use the SMTP password and not the control panel password
- You can test your SMTP username and password using our online password checker tool
- For the 'Host Name' enter 'mail.authsmtp.com'
- Untick 'Automatically manage connection settings' (IMPORTANT)
- Set the port to '465'
- For alternative ports see our online port checker tool
- Tick the box for 'Use TLS/SSL'
- Click on 'Authentication' and select 'MD5 Challenge-Response'
- Click 'OK'
Step 7
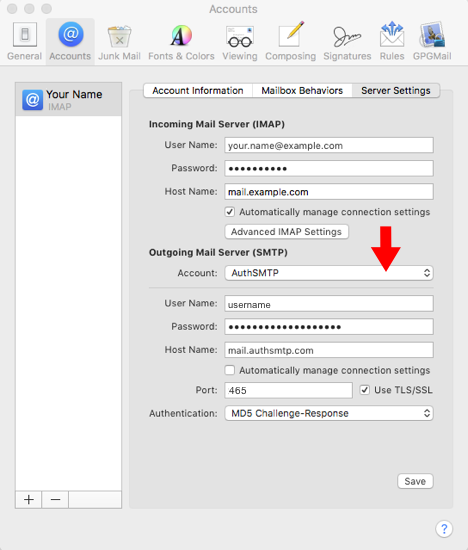
- You have now setup the AuthSMTP outgoing mail server
- Please ensure that 'AuthSMTP' is selected in the drop-down menu next to 'Outgoing Mail Server'
- Click 'Save' to keep the changes
Step 8
- If you would like to use your AuthSMTP service with multiple accounts we would recommend that you configure each account in turn and restart Mac Mail between each account change, we have found issues with this version when editing multiple account configurations
- The setup is now completed and you should be able to send email via your AuthSMTP account