Qualcomm Eudora 7 for Windows - Change SMTP Relay Persona
IMPORTANT NOTICE: The Eudora program is no longer supported - whilst it *may* still work with our service using the setup guide below we unfortunately cannot provide support configuring or troubleshooting it. We recommend that you upgrade your email application to one that is currently updated and supported by the publisher.
Important Points
- First you need to make sure the email address(es) you will be sending from have been authorised for your account in our Control Panel .
- These instructions assume your email account has already been setup and is collecting email correctly.
- Take a note of any settings you change.
- Only change the items specified - you should not need to change either your email address, POP3 server, POP3 username /password.
- These instructions are for Qualcomm Eudora 7.x - for other email programs please see How To Setup AuthSMTP or contact us.
- These instructions only change the outgoing email server to use the AuthSMTP service, if you need to use the alternative port(23, 26, 2525) because your ISP blocks port 25 please see QualComm's website for instructions.
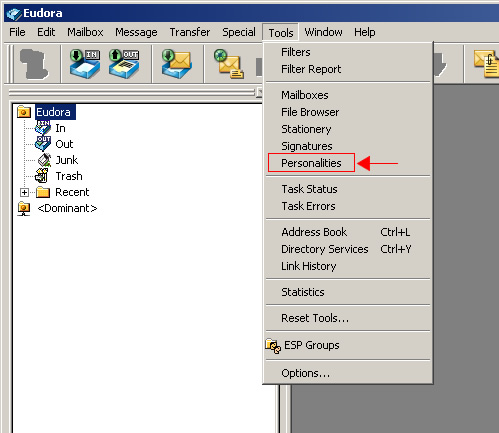
Step One
- Load Qualcomm Eudora 7.x
- Go to the 'Tools' Menu and click 'Personalities'
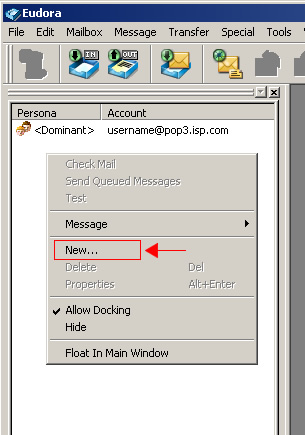
Step Two
- Right-click in the 'Personalities' column on the left-hand side
- Click 'New...'
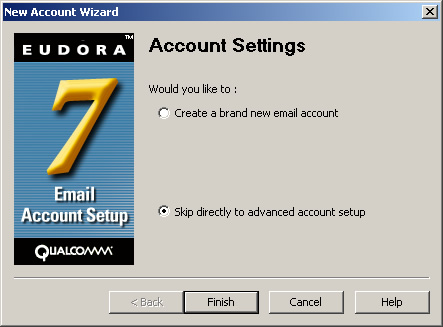
Step Three
- Choose 'Skip directly to advanced account setup' option and then click'Finish'
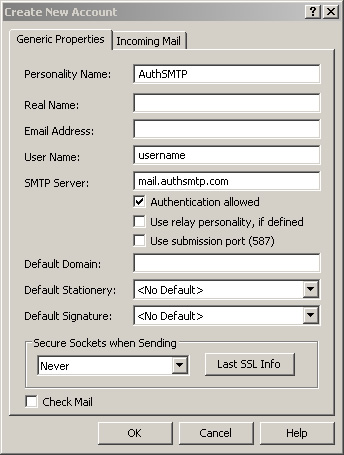
Step Four
- You should now see the 'Create New Account' window
- In the 'Personality Name' field enter 'AuthSMTP'
- In the 'username' field enter your AuthSMTP username
- In the 'SMTP Server' field enter the SMTP server we have emailed to you(Typically mail.authsmtp.com)
- Tick 'Authentication allowed'
- Untick 'Use relay personality, if defined' if ticked
- Change the drop down menu for 'Secure Sockets when Sending' to 'Never'
- Untick 'Check mail'
Step Five (Important)
- Go to the 'Incoming Mail' tab
- In the 'Server' field enter the SMTP server we have emailed to you (Typically mail.authsmtp.com)
- NOTE: This may sound a little strange to enter the SMTP server as an incoming server but is required for the setup to work
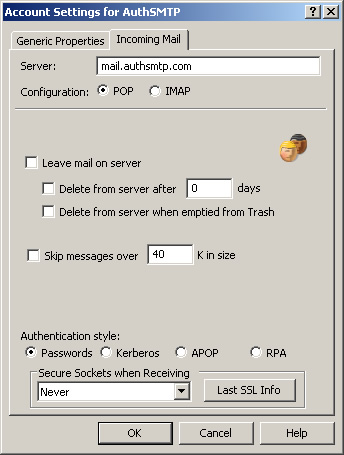
- Click 'OK'
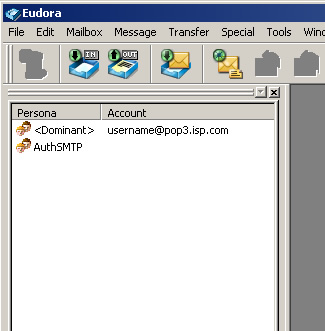
Step Six
- You will now see an additional personality has been created for your AuthSMTP service
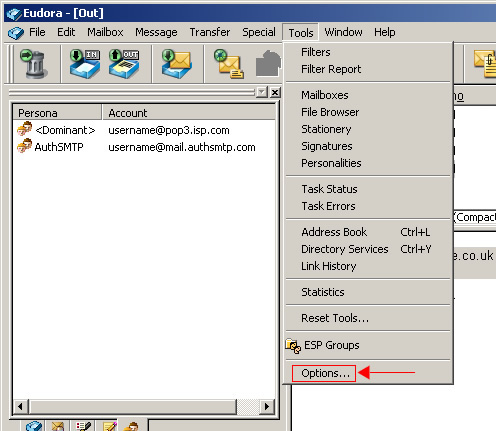
Step Seven
- Finally you need to make this your default server - Go to the 'Tools'menu and click 'Options'
Step Eight
- In the column on the left-hand side go to the 'Sending Mail' section
- Delete the contents of 'Domain to add...' and 'SMTP server' so that they are blank
- Change the drop down menu for 'SMTP Relay Personality' to 'AuthSMTP'
- Tick 'Allow Authentication'
- Tick 'Immediate Send'
- Tick 'Send on check'
- Change 'Secure sockets when sending' to 'Never'
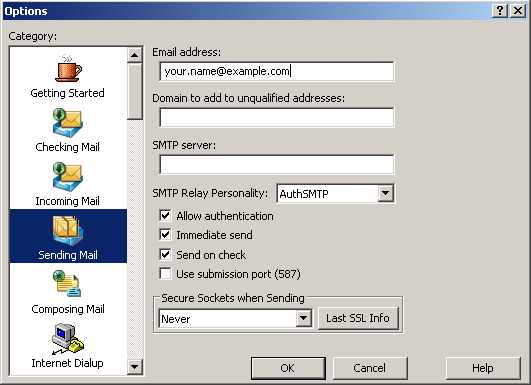
- Click 'OK' to save the changes
Step Nine
- To complete the setup you will need to close and restart Eudora
- When you send your first email you will be prompted to enter your AuthSMTP password
- If you have any problems please login to the Control Panel and check for errors being logged
- All done!